Abstract Nature: What is Abstraction
Abstract photography, sometimes called non-objective, experimental or conceptual photography, is a means of depicting a visual image that does not have an immediate association with the object world and that has been created through the use of photographic equipment, processes or materials. Primarily, abstract photography focuses on the elements of art and the principles of design. These are known as the formal elements of photography. Below are some examples of abstract photography that I am inspired by and some initial research into the formal elements of photography.


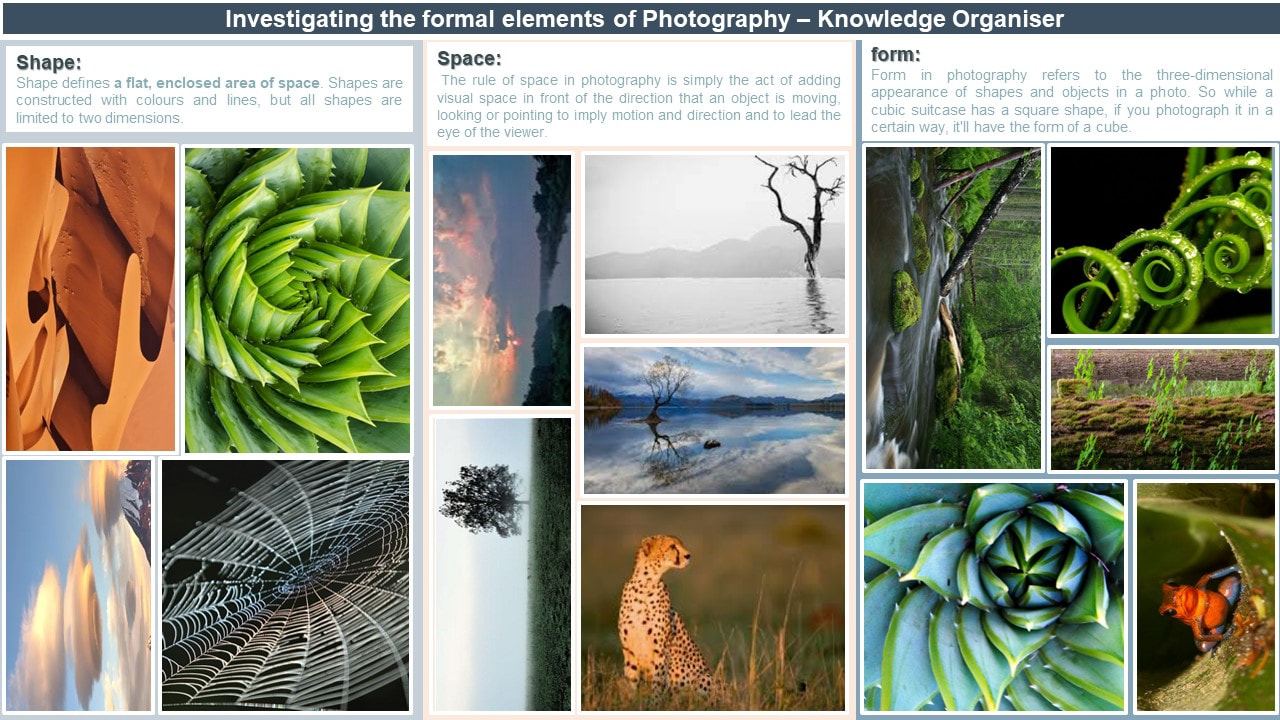
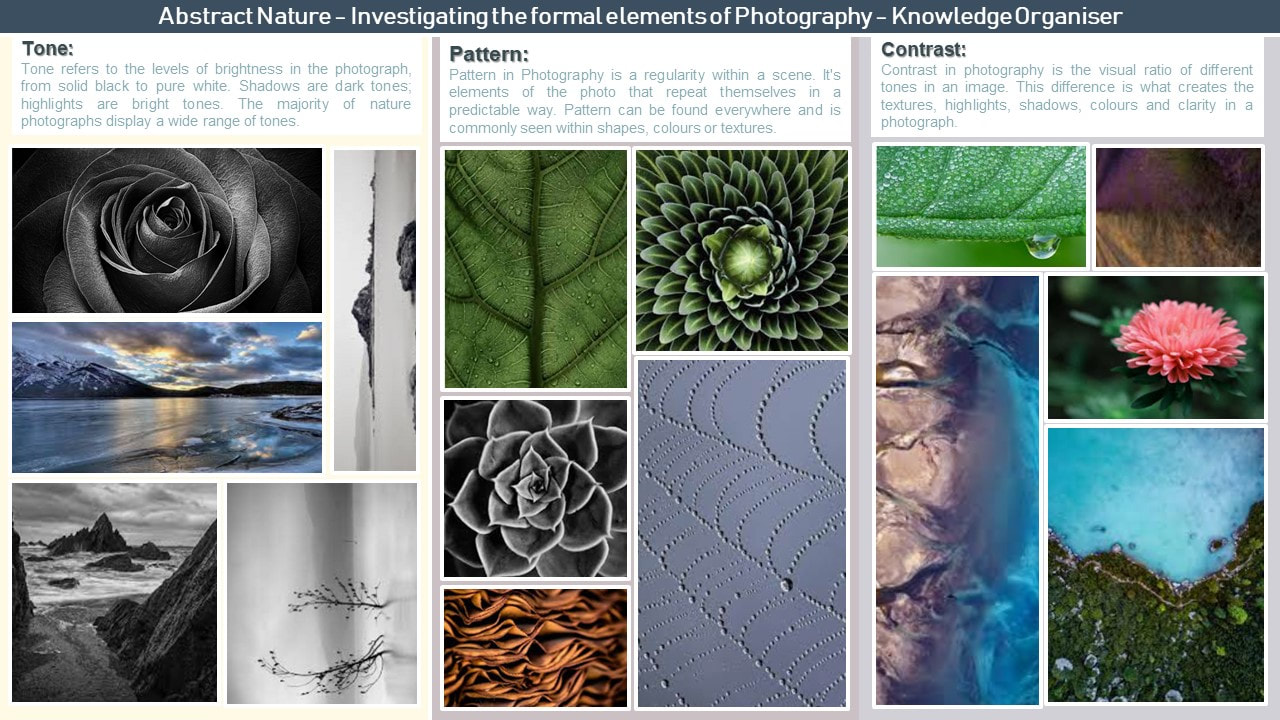
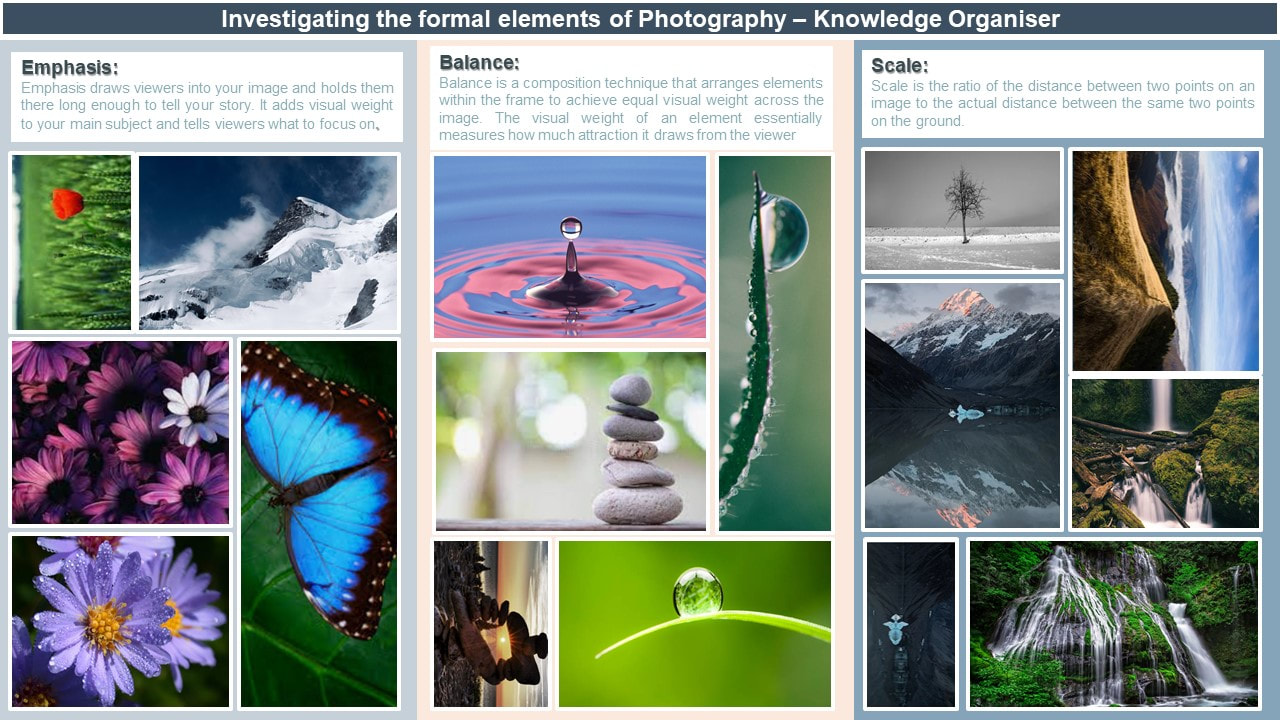
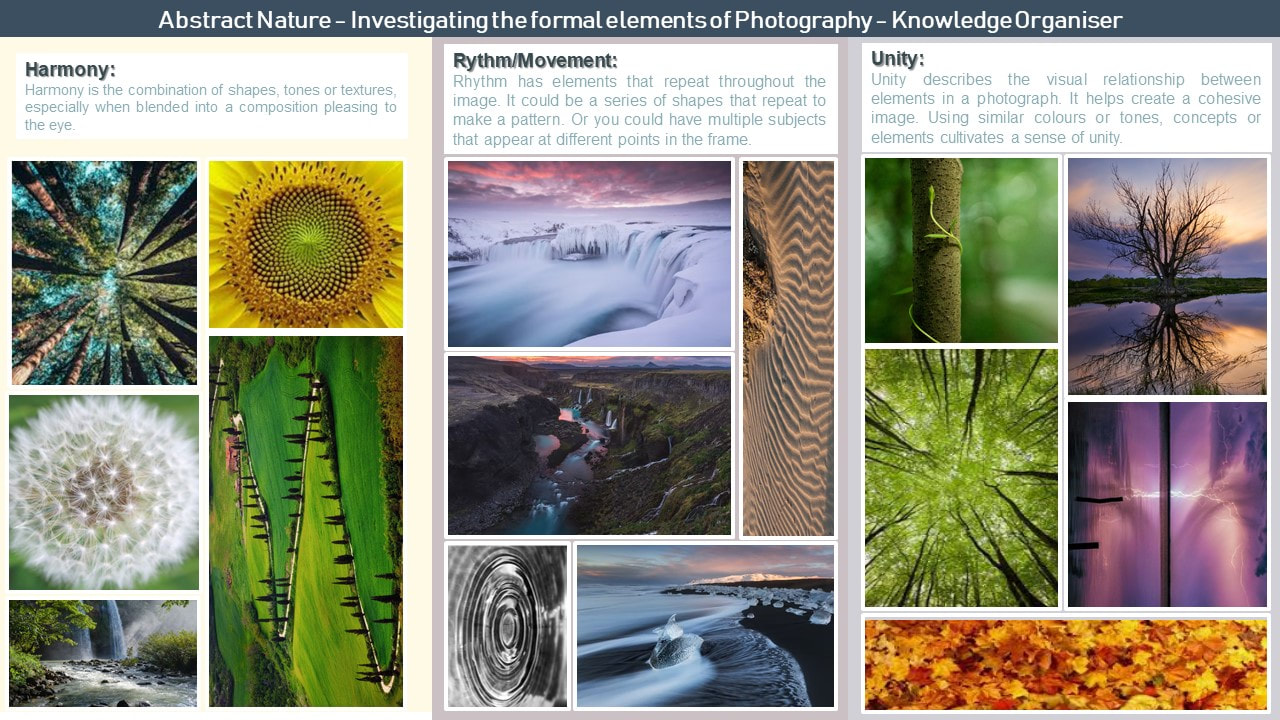
Investigating The Formal Elements Of Photography-

Monochromatic Photography Shoot
Contact Sheet:

|

|
9 Best Images:


Evaluation:
|
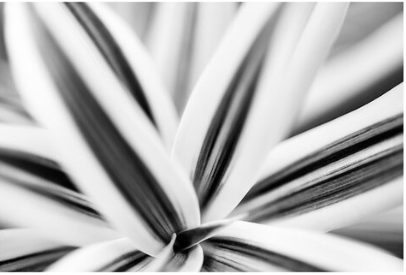
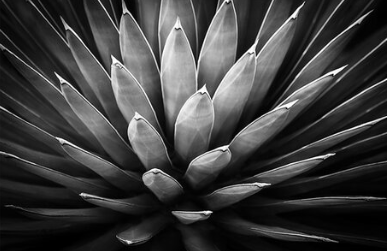
Shooting in Black and white means you can create abstract images that draw focus to other elements that aren't defined by colour. The elimination of colour means texture, line and tone are emphasised and stand out more as they are the main focus of the photo. This can be very effective as it stops the subject from being easily or immediately recognisable. Usually things aren't just black and white in real life so it gives an effect of taking you away from reality.
I used my DSLR camera (Canon 400D) and the standard kit lens on the monochromatic (B+W) setting. During this shoot I used automatic and aperture priority setting on f/4 this allowed me to show the texture up close and give less context to the surroundings. Most of theses images I took were taken among the foliage however I also used a lower worms eye vantage point (the top center image above). This allowed me to use the sky as a plain background rather than it ruining the focus of the photo. This shoot was conducted outside, although it was somewhat windy, the lighting was not an issue as this lead to me capturing a better view of the textures and tones. The weather also lead to me going in closer to the plants to capture all the vantage points. The weather did however limit the shoot as it began to rain lightly towards the end meaning taking sky facing shots was not always possible. Although these were not ideal conditions, the wind moving the leaves provided added detail and some unintentional camera movement in the images. I found these images to be particularly successful due to the leading lines and contrasting tones created by the leaves and monochromatic setting. |
|
ICM-Intentional Camera Movement Shoot
Contact Sheet:

|

|
9 Best Images:


Evaluation:
|
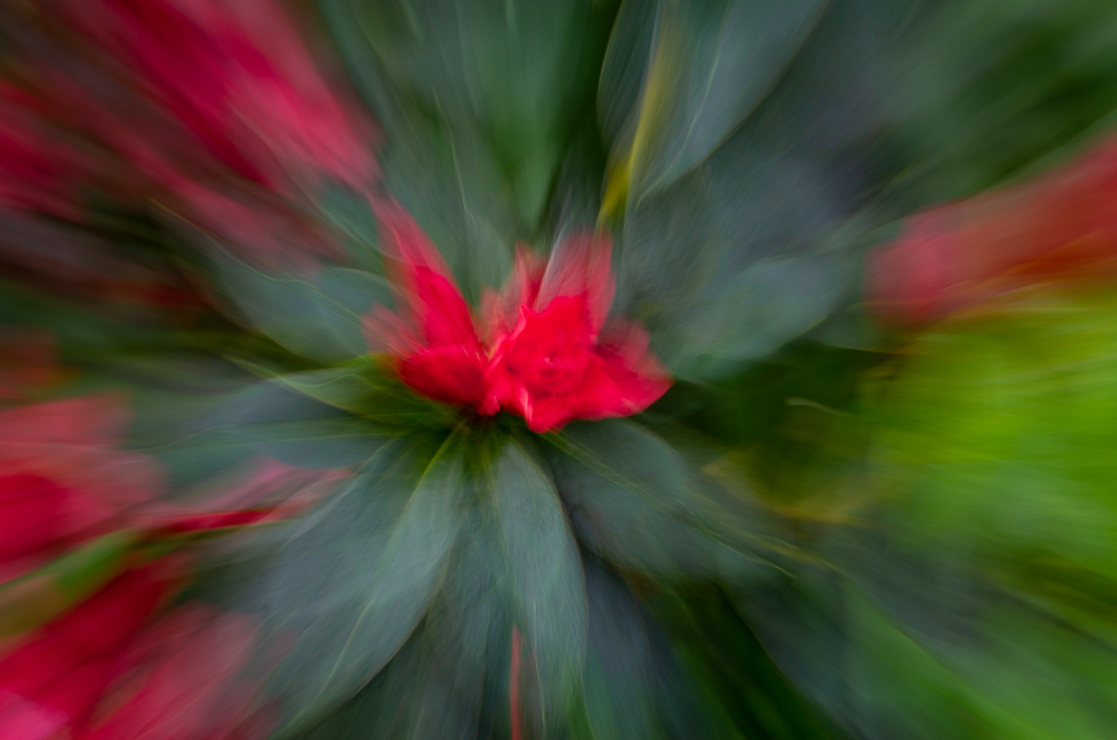
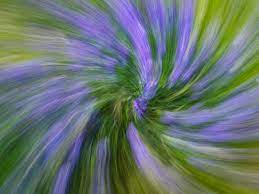
ICM (intentional camera movement) is where the cameras shutter speed is adjusted to expose the camera to more or less light. This happens during the exposure to create a blurred focus of the object. This causes the image points to move, producing streaking lines and shifting shapes and colour. The longer your exposure time the more blurred the object becomes. This can be used in abstract photography to cause the object being photographed to become completely unidentifiable.
During this shoot I used my DSLR camera (Canon 400D) and I used a shutter speed of 0"5. The process used of rotating the camera whilst shooting is what created the blurred spiral illusion. This was something I achieved in a few photos, for example in the bottom left photo displayed above. This was one of my most successful photos in my opinion. For this shoot I was indoors using artificial (fluorescent) lights. Shadows did affect the photos in the sense of creating some underexposed images, however the majority of photos had an ideal amount of light. A few of my images were affected by camera shake meaning some weren't successful however some photographs did benefit from this by causing the edges to blur and causing the colours to be enhanced. |

|
Investigation Of Abstract Techniques, Best Edits

|
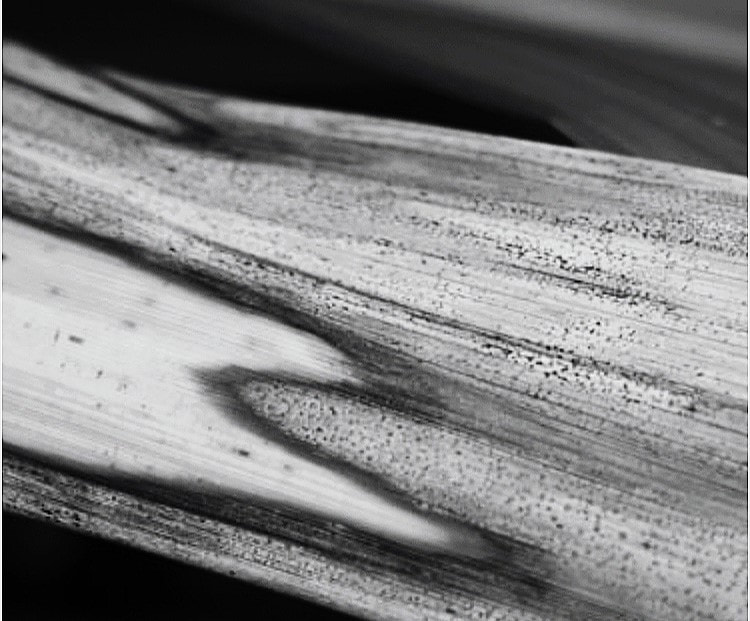
I chose this photo as one of my final edits because it has some well developed detail such as the defined lines and textures. When editing, I attempted to use the tonal histogram to create a better balance of tones. I think my end result was successful as all the line and tonal elements have been enhanced and show the detail of the object. However, the darker tones do still seem to dominate the image. This is something I could attempt to amend with further editing. I also experimented with the contrast and brightness editing tools. Overall, I think I managed to enhance the darker tones of the image and showcase the plant as the main focal point. Before I edited this photo the background was very distracting so I have blurred the background to make it less prominent in the photo, and I think my editing was very successful with this photo. My favourite element of this photo is the texture because as I adjusted the brightness, the texture was emphasised and creates an effect of physical touch. I can imagine the leaf to feel rough. From this effect I think I have captured texture well in this photograph. I attempted to use the rule of thirds with this photo, as shown in the last photograph of the editing process, however I ended up going for more of the similar tones rather than a large contrast of light to dark. My first step of cropping the photo, I think was extremely successful and it really brought out all those close up rough textures I was hoping for. It was tempting to not edit it at all after cropping because there was already so much detail and depth to the photo.
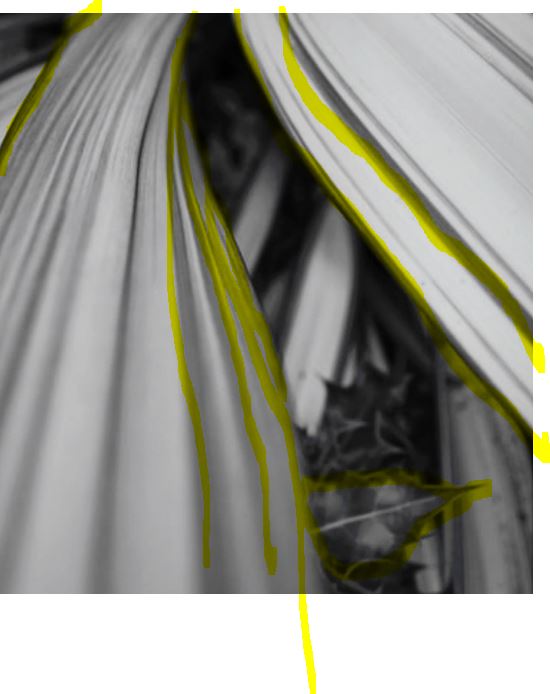
I believe this photo was my most successful overall as it manages to capture my attention every time. This photos contrast is well balanced and gives the image great tone, line and textural details. It also shows my ability to effectively use, close up/macro skills and editing skills. My editing process began with cropping a much larger image, to create a more abstract composition. In editing, I used the blur, contrast and adjustment tools to increase contrast between light and dark in the foreground (as well as sharpening the details) and blurred the leaf as you get closer to the lens. This helps draw focus to the high contrast/brightness in the parts further from the lens. I also used the blur filter to soften the look of the photo as it is 'closer' to the viewer and it blends out to a greater contrast further away. I like the contrast of the colours in this photo and I think the leading lines add to the success of it, as they are an effective way to guide the viewer's eyes and attention toward something specific. Subtle uses of lines can have tremendous impact on how an audience perceives a shot. The attention in this photo is mainly on the leading lines as it captivates a viewers attention at first sight. However, if you were to look deeper into the background of the image you can see there are many variations of leaves which can give more depth to the photo as there is more to explore throughout. |


|
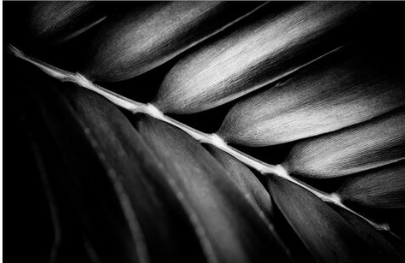
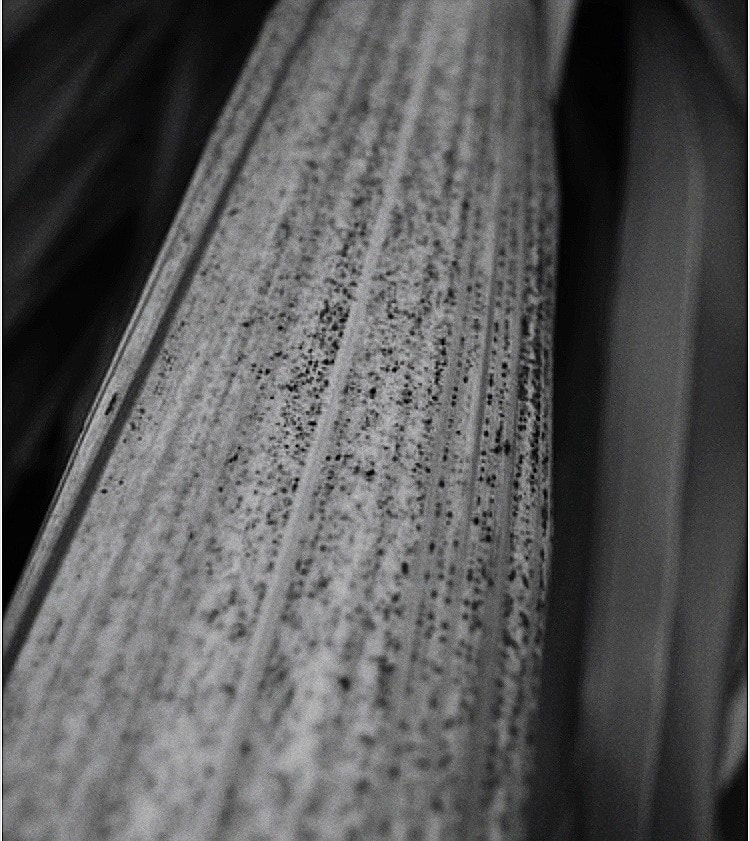
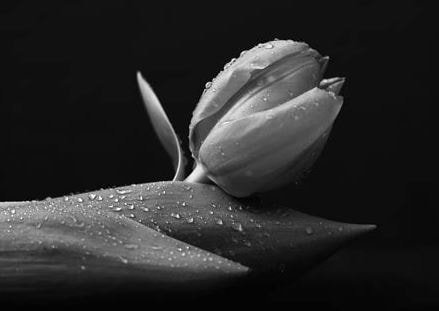
In this photograph I cropped the original image to gain an increased focus on the detail of the leaf. Post-shoot editing allowed me to adjust the balance of dark, light and mid-tones, I increased the contrast and brightness in attempt to heavily accentuate the lines on the leaf, so they were distinguishably separated. I also wanted to display the shapes created by the raindrops on the other side of the leaf, as they provide variety. I had to trial multiple different combinations of brightness, contrast and tonal adjustment to achieve this effect.
When I was happy with the main body of the leaf, I used isolating tools to make the background less bright. This draws more attention to the texture and line placement in the image. I find this image especially visually stimulating, as I feel the tonal balance is the best. The darkest tones lead the eyes to the centre of the image creating great compositional cohesion with the placement of the varying values. This is also evident in the highlights that frame the dark leading lines drawing the eye along the subject. I like how the leaf has an ombre effect as from the edges it is a darker hue and as you move to the centre of the leaf it becomes gradually lighter. This image captured my eye due to the dark tones and the burned effect. This image has an originally abstract composition and only required a small amount cropping, Compared to the other images, the leading lines on this photograph are more compelling to a viewer because the rusted feel each individual line has is effective. Also the charred part of the leaf breaks from the leading lines and brings composition into the photo. The darkness is accentuated around the burnt looking shape is darker than the 'mundane' part of the leaf and then on the inside of the shape it becomes light than the normal part of the leaf. Since the early days of film photography, photographers have used dodging and burning to enhance their photos. Simply stated, dodging lightens and burning darkens the areas where you apply the effect. So, considering these terms in this particular photograph, both of these techniques look to have been used before I even began editing. Of course I enhanced this look as I enjoy the contrast it brings to the photo. |


Artist Research / Edward Weston 1886-1958
|
Ansel Adams, Westons colleague and friend wrote: “Weston is, in the real sense, one of the few creative artists. He has recreated the matter-forms and forces of nature; he has made these forms eloquent of the fundamental unity of the world. His work illuminates man’s inner journey toward perfection of the spirit.”
His soft-focus, Pictorial-style portraits won many salon and professional awards; however, after viewing an exhibition of modern art at the San Francisco World’s Fair in 1915, Weston became dissatisfied with his own work. His photographs of the ARMCO Steelworks in Ohio of 1922 marked a turning point in his career. These industrial photographs were “straight” images: unpretentious and true to reality. Weston later wrote: “The camera should be used for a recording of life, for rendering the very substance and quintessence of the thing itself, whether it be polished steel or palpitating flesh.” Tina Modotti, of whom he made important portraits and nude studies over several years. Through Modotti, an accomplished photographer in her own right, Weston became friendly with artists of the Mexican Renaissance, including Rivera, Siqueiros and Orozco, all of whom encouraged his new direction. During his final 10 years of progressively incapacitating illness, Weston oversaw his son, Brett, making his final portfolio. Edward Weston’s archive is located at the Center for Creative Photography in Tucson, Arizona, and his original photographs have sold at auction for a record $1.6 million. |
Edward Henry Weston
Born: Highland Park, Illinois Raised: Chicago 1906: Moved to California and operated a mobile portrait photography studio. 1915: Viewed an exhibition of modern art at the San Francisco World’s Fair. 1920: Along with his studio partner, Margarethe Mather, he began experimenting with semi-abstractions in a hard-edged style. 1922: Traveled to New York City, where he met Alfred Stieglitz, Paul Strand and Charles Sheeler 1923: Moved to Mexico City where he opened a studio with his apprentice and lover, Tina Modotti 1924: Abandoned the use of soft-focus techniques entirely and started his precise studies of natural forms. 1926: Returned to California permanently and began a series of joint exhibitions with his precocious son, Brett, and then went on to the work that he is most deservedly famous: natural-form close-ups, nudes, and landscapes. 1928: Edward and Brett Weston opened a San Francisco studio together. 1929: Edward and Brett moved to Carmel and began photographing in the Point Lobos area. 1929:At this time, Edward also organized the American section of the Stuttgart Film und Foto exhibition with Edward Steichen. 1932: Weston became a founding member of the Modernist photography Group f/64, along with Ansel Adams, Willard Van Dyke, Imogen Cunningham, and Sonya Noskowiak. The Art of Edward Weston, an edition of nearly 40 photographs, was published by Merle Armitage later the same year. 1933: Weston photographed for the WPA Federal Arts Project in New Mexico and California. 1937: Weston was the first recipient of a Guggenheim Fellowship for Photography. 1937-1938: He photographed the West and Southwest between Two years. Later, he provided illustrations for an edition of Whitman’s, Leaves of Grass, from photographs made in the Southern and Eastern states. 1946: A major retrospective of Weston’s work was held at the Museum of Modern Art, New York, which featured 300 of his original photographs. 1947: Weston began experiments with colour photography the following year, and was the subject of a film, The Photographer, by Willard Van Dyke. 1948: Plagued by Parkinson’s disease, Edward took his last photographs at Point Lobos. |


SEMI Analysis / Edward Weston
|
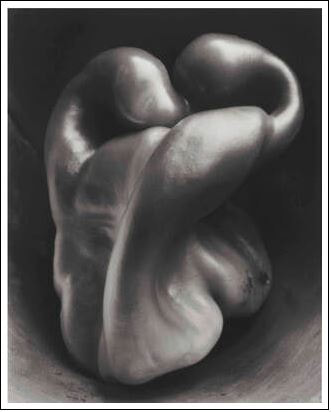
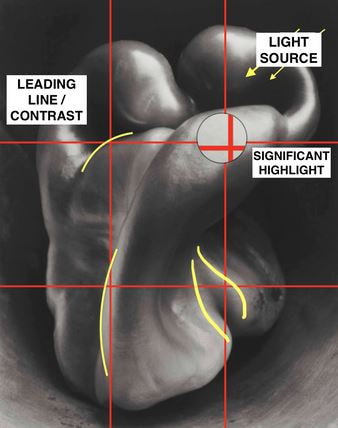
Subject:
The title of this photograph is 'Pepper No. 30' it was created on August 3rd, 1927 by the photographer Edward Weston. It became one of his most well-known/famous images because of its prominent form, lighting, and composition. It illustrates a solitary green pepper in black and white contrast, with a noticeable light from above. The long, twisting and winding curves depict the smooth surfaces and the originality of the image. The pepper is unusual and intriguing. Weston stated that 'Taking the Ordinary and Making it Extraordinary' was his style of photography. The reflection of light bouncing of the peppers skin suggests a sense of unpredictably from the subject. The pepper moves boundlessly and effortlessly around into a twisted mold of the conventionally mundane vegetable. Elements: The photographer has used composition and perspective to embody the pepper. Weston has used the rule of thirds to create balance in the photograph; at each intersection there is a point of interest which stands out among the rest of the section. Which means that although the focal point is not in the centre square alone, their are multiple focal points equally distributed across the image. The contrast from the subject to the background frames the pepper, keeping the viewer's eye focused on the shape and motion of the object. Weston has taken this photograph from eye view, which we can tell because of the way light is projected onto the peppers skin and the direction of the lights reflectivity. This is effective because it presents the viewer with a familiar perspective, contrasting with the unfamiliarity of the unusual pepper shape. The viewer's eye is led around the image, this effect is portrayed by a combination of; intentional dramatic lighting, curvaceous leading lines, and low exposure which also creates great contrast. The arch of leading lines at the top of the pepper, guide the eyes away from the center of the image and from their, naturally your eyes are guided through the loop and back. The meaningful journey this image guides a viewer through is interesting yet effective. The most captivating leading line in the center of the image however has a more immediate impact on the viewer, as they are prompted to follow it instantly, exploring the entire image's potential. As I expressed previously, the photographer utilizes a range of visual elements. The most visually enticing elements are; shape, space, and form. The prominent light and dark contrast create simplified shapes distinguished by single tones which help the audience to familiarize themselves with the form of the subject through smaller sections. The space in the background emphasises the mystery of the subject's form, and the elimination of colour leaves the viewer feeling intrigue and fascination from the images vast range of tones, as well as placing it in less context, increasing the abstractness of the photo. Media: What is shallow depth of field? Shooting with a shallow depth of field is “having a plane that's in focus, and everything else is out of focus,” explains experienced photographer Jeff Carlson. It's a technical choice, influenced by the aperture on your lens (google definition). Therefore, Weston will have had his camera carefully placed to ensure the accuracy of the images balance and composition. This intentional process is a large reason for the success of this photo. |

|
Technical Processes / Low Key
|
Low key photography is a genre involving the lowering of camera exposure. The aim of this is to create a much darker background. The use of this particular technique can create more dramatic and hard-hitting image. This will heighten connotations between the subject and alienation, creating a mysterious, dramatic or emotionally evocative atmosphere. Low key photography can also be enhanced through editing, this emphasises natural/artificial light only on specific areas in the frame to concentrate shadows and texture.
|


Shoot Plan / Edward Weston

|
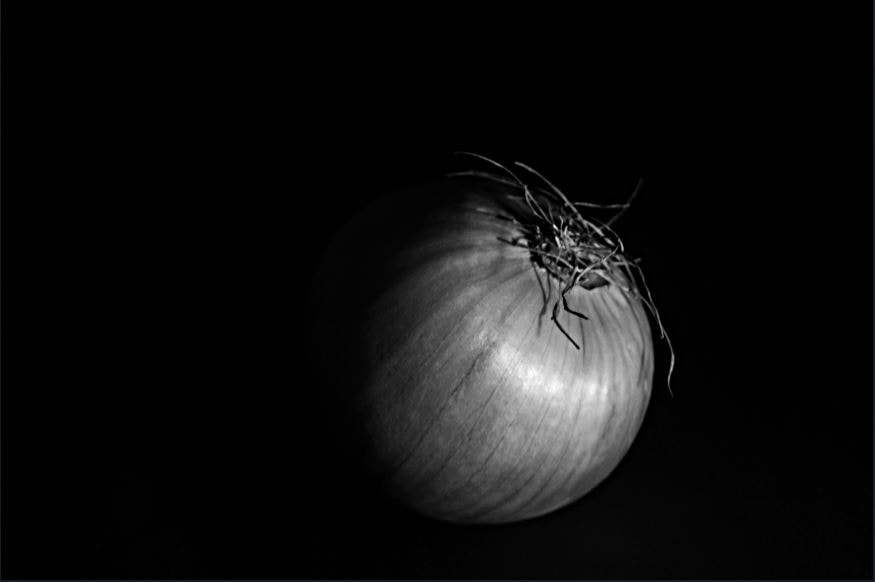
This shoot is inspired by Edward Weston's photography style, more specifically his use of low-key, monochromatic vegetable imagery. This method links to the current focus of 'abstract nature' as his aim in these shoots was to place mundane objects into an abstract context. His ability to make these overlooked objects appear as abstract forms. His use of light and shadows highlighting certain parts of the vegetable is effective and gives the view that the vegetables were deliberately made that way for his purpose.
My shoot will take place indoors utilising natural ambient light, I will start by placing the subject and props by a bright window. I will ideally conduct the shoot at midday: optimising the light available . It would also be ideal to shoot on a sunny/ non-overcast day, to emulate his work well. |
Contact Sheet / Edward Weston

Best Edit / Edward Weston
Abstraction through Cyanotypes / Anna Atkins
Who was Anna Atkins?
Anna Atkins (1799-1871) was an influential English photographer and botanist. As she is potentially the first woman to create a photograph and the first person to create a photographically illustrated book, she is and remains an important female historical figure.
Her work, especially her series of cyanotypes depicting various natural specimens, was important in extending our understanding of the science of botany. This is due to the incredible detail captured in these images.
What are cyanotypes?
Cyanotype is a photographic printing process that produces a cyan-blue print. It was invented in the 1840's and unlike many other photographic processes ay the time, was simple and evaded the use of dangerous chemicals.
Creating cyanotypes does not involve the use of a camera. The process is carried out by coating a sheet of paper in iron salts and placing it in the sun with an object laid on it. It is then washed in water, creating a rich blue image and leaving a pale imprint where the object lay.
https://www.youtube.com/watch?v=pH3onQbfzc4


My Emulations:


Horst P. Horst / The Unfamiliar and Abstracted

Abstraction through Photograms / Man Ray
|
|
Who was Man Ray?
Man Ray is a famous 20th Century artist, (born 1890-1976). He worked with a range of mediums and considered himself chiefly as a painter. However he is best known for his photographic works, which have strong affiliations with the Dada and Surrealist movements. He is also particularly celebrated for his work with photograms, also known as Rayogrammes. Ray often used light and shadow in his photographic work. His photograms are the epitome of his experimentation with this artistic characteristic. |
What are photograms?
Photograms are a type of photo that is created with the absence of a camera. It encompasses the placement of objects on photo sensitised paper followed by its exposure to light. (Depending on the extent of the object's opacity) where it touches the surface of the paper it will shield it from the light, leaving a white or pale grey impression.
However if light is able to permeate a translucent part of the object or reach under its surface it will change in tone. If there is no protection at all the paper will turn black.


My Emulations:


Technical Process / High Key
|
|
High key photography is the process of taking a photo with no shadows, to capture this you need to use a lot of light causing a predominance of light or bright tones in the image.
To create a high key image you need; an LED light, a Perspex diffuser, receivers, DSLR camera, macro lens, a book, blue tack, a remote flash and a natural form. These devices all need to be set up like in the diagram below and you will have captured high key photography. |


Shoot Plan / Karl Blossfeldt

|

|

This shoot was inspired by Karl Blossfeldt as I have been studying the way he creates abstracted forms from nature and I was very keen to emulate his style. This shoot will be taken in the classroom so then I can control the lighting and get the best results. I will set u three shoots and will experiment with them all and try to emulate Blossfeldts work using the High-key photography technique.
The props I will be using is natural forms. I'm using these as this will get my photos to fully emulate Blossfeldts work as this is what he commonly used. Using these, it will give me a good range of textures, lines and forms throughout my images. For all of my shoots, I will be using a white background.
The props I will be using is natural forms. I'm using these as this will get my photos to fully emulate Blossfeldts work as this is what he commonly used. Using these, it will give me a good range of textures, lines and forms throughout my images. For all of my shoots, I will be using a white background.


Contact Sheet / Karl Blossfeldt

Editing Process / Karl Blossfeldt
|
1. Crop the image
|
2. Using the filters to adjust shadows and light in the image.
|
3. Adjusting the levels of the image, for the best range of tones and contrast.
|

|

|

|
9 Best Images / Karl blossfeldt:


Final Outcome / Explosion Sketchbook


Artist Investigation / Dennis Wojtkiewicz
|
|
|
Why this artist?
The final artist we will be exploring in the Abstract Nature project is Dennis Wojtkiewicz. This artist differs from the others previously studied: his main media is not photography (he is a painter); he is a modern, contemporary artist and furthermore his work incorporates, and is distinguishable due to its use of colour. However, there are similarities in his use of macro, still life photography, of natural specimens (fruit similar to Weston) and style of analytical photography (like Blossfeldt's work reminiscent of scientific study).
The final artist we will be exploring in the Abstract Nature project is Dennis Wojtkiewicz. This artist differs from the others previously studied: his main media is not photography (he is a painter); he is a modern, contemporary artist and furthermore his work incorporates, and is distinguishable due to its use of colour. However, there are similarities in his use of macro, still life photography, of natural specimens (fruit similar to Weston) and style of analytical photography (like Blossfeldt's work reminiscent of scientific study).


Photographic Techniques / Back Lighting Fruit
|
|
Backlighting is the process of illuminating the subject from behind, resulting in a glowing effect on the edges of the subject/object. Backlight photography works to highlight the depth behind the subject, giving the piece an overall greater sense of place due to the seemingly larger image plane. This can also produce a more intently dramatic image due to the contrast between the subject and the background. To capture the labyrinthine details, the photographer would have to use either a macro lens or reverse ring. You need to either use a light box or glass pane (with light source underneath) to successfully backlight the object. Furthermore, A tripod should be used with a shutter release cable to ensure no camera shake.
|

|
Step 1: Slice the fruit (a kiwi or strawberry), ensuring the slices area even and thin, so the colours will be bright but not over-exposed.
|
Step 2: Lay the slice on the glass set-up, with the light source placed directly under the fruit.
|
Step 3: Adjust camera
|
Step 4: Take image
|
Shoot Plan / Dennis Wojtkiewicz

Contact Sheet / Dennis Wojtkiewicz

|

|
Post Editing / Dennis Wojtkiewicz

|

|
|
1. Firstly I cropped my image and adjusted the brightness, contrast, temperature, tint, hue and saturation.
|
2. Next I used the magic wand tool to get rid of the background and then I added a new layer and filled it in with white.
|
|
|
|
3.Then I cropped my kiwi and duplicated it and flipped it horizontally and vertically.
|
4. Lastly I adjusted the colours and made some kiwis black and white and for 2 I just adjusted the brightness.
|
My Emulations:


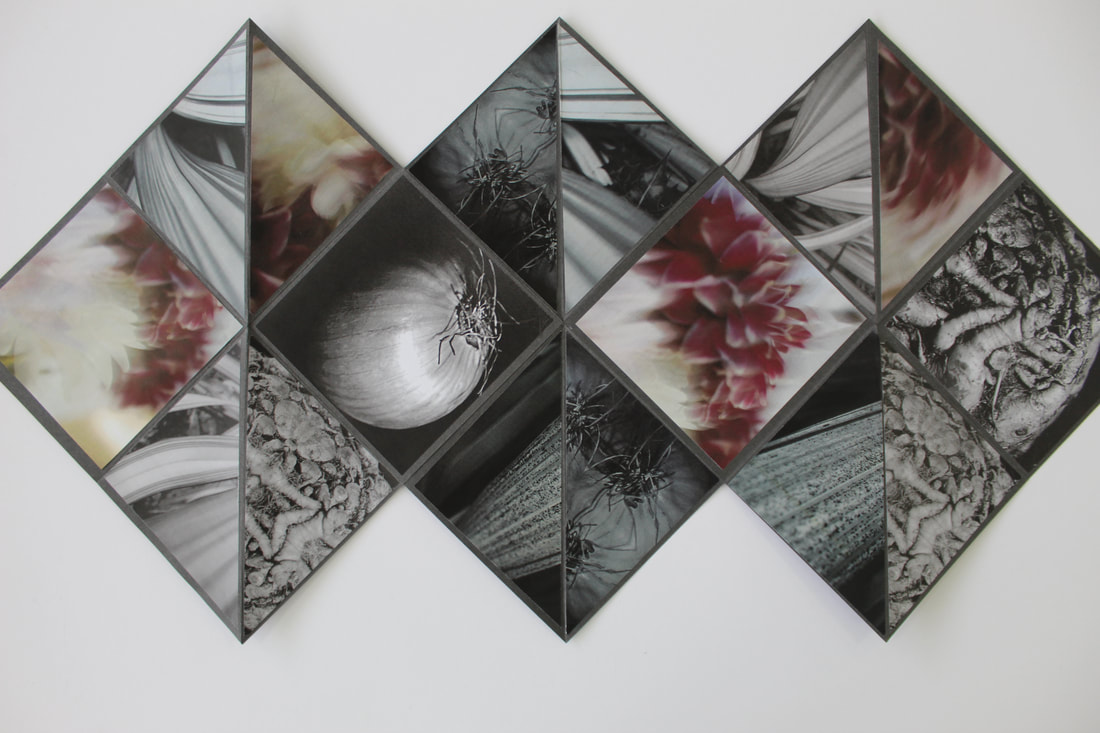
Rotational Designs / Dennis Wojtkiewicz - Physical Edits


Abstract Nature - Final Evaluation
During this project I have developed an understanding of creating a successful photograph from using digital editing. The photographic techniques and processes I used were new to me and even though I struggled at first I enjoyed being able to experience playing around with these different techniques and processes. The key skills used in the mock were; analysing and applying knowledge of composition, manipulating images through digital editing, photography in the absence of a camera, lighting- high key and low key photography, and how to effectively use photography when given an opposing response a different viewpoint.
Throughout the course of this project I have furthered my knowledge of abstract photography by exploring the theme of nature where I have looked at a variety of natural forms, for example the flat-laid fruit investigation. I have experimented with texture, colour and emphasis in my final artist response to Dennis Wojtkiewicz and also exploring space, texture and form in my Karl Blossfeldt's project as well as emulation, space, balance and emphasis in my Weston responses. I have experimented with different techniques of abstraction with: intentional camera movement: which creates the effect of blurring the outside edges of an image and softening them which focuses on the rhythm and tonality rather than defining the object. I also explored Monochromatizing imagery which is used to draw attention to elements other than colour such as rhythm and movement. Lastly was rotation which used pattern, repetition and rhythm. From this I can now understand the benefits of abstraction, and how removing objective from a subject can allow for a more interesting and eye capturing image.
Initially I analysed the work of Edward Weston, his incredible use of composition and development of the low-key and still-life genres was inspiring. His most successful and well known photo is called 'Pepper No. 30', and through my research I have discovered the use of low key photography and the impact it can have on a viewer. It is impressive, how easily capturing a slight detail in an image and emphasising it can single-handedly create a completely different focus of an image. Other elements such as tone, contrast, and texture contribute to the depth of the photograph. Exploring Weston's work also led me to understand the inspiration behind his work and that he says "Anything that excites me for any reason, I will photograph; not searching for unusual subject matter, but making the commonplace unusual." Which is truly admirable, as creating photography to him required much more than a camera and skill, he had passion for what he did which added to his photographs and created meaning behind every single photograph. Back then due to lack of digital editing, physical editing and image development being an extremely long winded, complicated process his ability to access an understanding and development of composition before and during a shoot is a prominent factor for his success. This interested me and inspired me to learn more about composition and the skill required in those days to achieve it. In my research of Edward Weston I learnt more in depth about; the rule of thirds, the golden ratio, leading lines. These skills I can now use within my own work and I feel my final outcomes from this investigation were much more successful than they would've been if I had not researched composition, I understand some images were still however lacking but next time I can use my prior experiences and failures as inspiration to do better and potentially investigate more into composition.
The second artist I explored was Anna Atkins, who was a 19th century photographer and botanist. Her work of using cyanotypes was very engaging for me as I had never seen anything like it and the process inspired me, her work seemed to link in well with our topic as her photographic work was based on nature and used natural forms. The cyanotype process was interesting, the technical employment of light and selection of natural forms based on transparency was clearly deliberate and I too decided to think logically about how successful my photographs would be from how opaque or transparent my natural forms were. When deciding how to go about this shoot I took into consideration in my emulative work. I was also intrigued by Atkins' floral cyanotypes and how the use of different specimens effected the result drastically. I also was intrigued about how the cyanotypes get their rich blue colour and so I did some research on the matter and found that Cyanotypes are one of the oldest photographic printing processes in the history of photography. The distinctive feature of the print is its shade of cyan blue, which results from its exposure to ultraviolet light. Looking at early photographic processes allowed me to better recognise the technology behind digital photography we use today which allowed me to link back to the digital editing used for my Edward Weston images and how dramatically emphasised some of my images were which made me go back and change some of my images to intensify the subject of the matter. By simplifying photography to light exposure and the reacting chemicals, I was given a new perspective of photography and the drastic changes it has been through. One of my favourite cyanotypes that I created was one that technically went wrong as it had moved during the UV light process however it created a lighter outline on the outside of the natural form creating a sort of fine lined effect which I think really added to the success of that particular cyanotype, however some of my cyanotypes came out similar to that and weren't as successful due to the natural form used, which is why I had to think analytically about all my decisions during this process as it is an intricate process and requires lotsa of attention to detail and also lots of mistakes to be made until you know what you want.
I briefly looked into the work of the artist Horst P. Horst which allowed me to further my knowledge into this topic. I developed a better understanding of rotational symmetry. Horst P. Horst was one of the original pioneers of 20th Century fashion photography. His signature style is combining portraiture and fashion with simple but essential embellishments. His photographs were the subject of a solo exhibition at the Victoria & Albert Museum in 2015.
I also researched the work of the artist Man Ray which linked in well with the Anna Atkins topic. He produced major works in a variety of media but considered himself a painter above all. He was best known for his new methods and ideas in photography, and was a renowned fashion and portrait photographer. He is also noted for his work with photograms, which he called "rayographs" in reference to himself. When researching photograms I found the process of physically editing backgrounds by painting on the chemicals to deliberately only develop specific areas captivating. When researching his work I began to see how photography can overlap with art and how even with earlier photographic technology- abstraction and artistic editing could be successfully used and how much more skill was required. By looking at the artist Man Ray I saw the further methods of abstraction he used as his work makes capital of the monochromatic product however still intentionally focuses on features including shape and composition.
Next I went on to research Karl Blossfeldt's, a famous photographer. The key aspect in his photography still life. He is a German photographer. His techniques allowed me to explore a different perspective from the lighting style, similarly to my previous Weston project, high key photography is used. I found his work interesting, when exploring Blossfeldt's work I found that it was a simplistic yet effective style. I found that the combination of artistic principles used created a semi-abstract effect. In my Blossfeldt's emulations I used his shadowed style of photography to best capture his work. I found that the aura of his photographs were created by his use of space and high key lighting style, the use of this style emphasised other features such as texture, tone, and form. The objects he chose to photograph were quite ordinary every day items and were not rare but his use of magnification created a natural form in semi abstraction which placed the seemingly 'normal' and 'mundane' against a blank background, away from our typical views and objectives of an image. This use of restful and balanced composition emits an unnatural and eerie feeling as it is completely deliberate; the combination in his images of the exaggeration and emphasis placed on the seemingly 'strange' subjects allowed me to understand a range of 'the weird and wonderful' in every day life. I have been given a new perspective of abstraction.
The Final artist I investigated was Dennis Wojtkiewicz, who was infact more famously a painter than a photographer as he would photograph an image, usually of fruit, then he would paint it. I was extremely inspired by the brilliant contrast in hues he employed through his work. The use of backlighting was effective through his images as it emphasised the use of colour and he employed this idea which created his famous hyper-realistic paintings. When learning of the processes he used I could understand how he was so successful for photographing reference images. I was excited to emulate this in my own work. When emulating his work we were given the opportunity to explore backlighting in my own way and employ that into my own photography work. I used the inspiration he had found, to highlight intricate detail and texture within a semi-translucent subject, in my emulations and I feel that i was overall succesful in this topic. Even though my initial shoot was not as successful as I had hoped I was happy with my overall work and the final rotational edits I created. I felt that my composition and editing emulated the influences I got from Blossfeldt's work, and I feel my final outcomes from the overlays were not my favourite style of photography I still enjoyed and found the experience interesting and helpful to further my knowledge throughout the photography course. When experimenting with overlays I was given a chance to employ editing to a different type of imagery and abstraction, in my earlier editing with the Edward Weston topic I was just experimenting with; brightness, contrast, temperature, tint, hue, saturation, vibrancy and monochrome. However in this topic I was allowed to use a wide range for skills I had not been introduced to before such as; the lasso select tool, blend modes which included colour dodge, colour burn, hard light, soft light, luminosity and saturation. I also explored overlays which was new to me and the use of background filling and changing and flipping the subjects to create an abstract outcome.
To summarise, I believe my most successful outcomes of this project was the dennis wojtkiewicz work as I developed my skills through the entire abstract nature project and brought it all together to create my final piece.
